| 50%; click for full size |
|---|
|
Chimera demo using version 1.2318
February 14, 2007
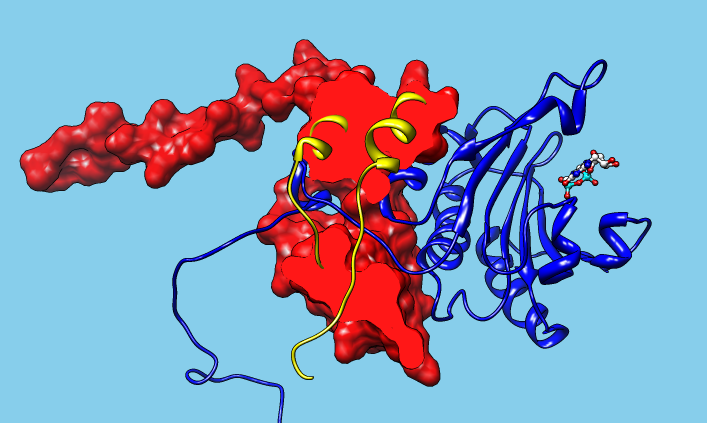
This page describes how to create the image at right in Chimera. The recipe here is just an example, because there are often multiple ways of accomplishing a given step, and the steps could be performed in a different order.
Start by opening PDB entry 1rf8. If fetched or opened as a regular PDB file, delete all the models except the first:
Command: delete #0.2-11If opened as a trajectory with MD Movie, just show the first frame. Then, proceed to make the display look like the image. Throughout, move and scale the structure as desired.
Command: ~dispThe surfcat business above is needed to tell Chimera to generate a surface that encloses just chain B instead of A and B together. For most structures, the default surface will enclose what you want it to enclose, and that step won't be necessary.
Command: disp ligand
Command: rep bs
Command: color byatom
Command: ribbon
Command: rainbow chain
Command: ribrep smooth
Command: surfcat partb :.b
Command: surf partb
Menu: Tools... Depiction... Per-Model Clipping - choose the MSMS partb surface as the model to clip; enable clippingIn Per-Model Clipping, turn on adjustment with the mouse. Adjust the position of the plane (and the position of the structure and the dimensions of the Chimera window) as desired. Turn off clipping adjustment with the mouse; Close.
Menu: Tools... Depiction... Surface Capping - turn on capping of surfaces at clip planes; use the color in the well, change it to red; Close
Menu: Select... Chain... B
Menu: Actions... Color... ["tear off" by choosing the dashed line]
...then in the torn-off Color menu:set target to ribbons; color them yellow (then clear the selection)
set target to background; all colors... sky blue
set target to depth cue; all colors... sky blue
set target to all of the above (then close the menu)
Menu: Favorites... Model Panel - choose MSMS partb surface on left, attributes... on the right; adjust vertex density to 5 (enter value and hit return); Close the attributes and the Model PanelFor more information on this interesting structure, see:
Menu: Tools... Viewing Controls... Effects - set subdivision quality to 5; turn on silhouette edges; Close
Menu: Tools... Viewing Controls... Shininess Control - use maximum shininess, brightness; Close
Optionally, add some labels (not included in the image above):
Menu: Tools... Utilities... 2D Labels - create some labels, for example blueish "eIF4E" and reddish "eIF4G"; Close
Menu: File... Save Image - on this panel,I clicked Get Pixels to specify a final image with the same number of pixels as the current display. With 3x3 supersampling (the default), initially an image 9 times as big will be saved, then sampled down to the requested size. Clicking Save As draws the image in tiled fashion. Finally, another dialog will appear for specifying file format, location, and name.
- clicking Image Setup shows pixels/length and supersampling settings
- clicking Tips shows a manual page with tips for creating images
Gross, J.D., Moerke, N.J., von der Haar, T., Lugovskoy, A.A., Sachs, A.B., McCarthy, J.E., and Wagner, G. "Ribosome loading onto the mRNA cap is driven by conformational coupling between eIF4G and eIF4E." Cell 115(6):739-750 (2003).
Starting from the state in which the image was saved above,
Menu: Tools... Viewing Controls... Effects - turn off silhouette edges; CloseTest some movement commands:
Command: savepos pos1Open Movie Recorder:
Command: rock y -4 68
Command: scale 1.05 20
Command: reset pos1
Menu: Tools... Utilities... Movie RecorderAfter making sure no other windows are overlapping the Chimera window, click Record in Movie Recorder. Re-execute the rock and scale commands (you can get them from the pulldown of recently used commands). In Movie Recorder, click Stop; adjust the output format/location as desired, then click Make movie. Wait for encoding to finish, then enjoy your movie! Example scripts for fancier movies are included in the Chimera User's Guide.